In today’s fast-paced digital world, efficient file management is essential. Manually organizing files can be time-consuming and prone to errors. Fortunately, automation comes to the rescue. In this blog post, we’ll explore how to develop a Bash script that monitors Git repositories and images, automatically moving them to designated folders. We’ll cover the step-by-step process, from planning to implementation, and explain how to run the script as a system process. Let’s dive in!
Defining the Objective
To begin, it’s crucial to define the objective of our script. In our case, we want to automate the detection and movement of Git repositories and images to designated folders. This will save time and streamline file management.
Planning the Script
Before writing any code, it’s essential to plan the script’s structure and functionality. Break down the task into smaller steps and determine the logic and flow. Consider input requirements, expected output, and error handling. A well-planned script ensures a smoother development process.
Choosing the Scripting Language
For our purposes, we’ll be using Bash, a widely-used scripting language on Linux systems. Bash offers powerful command-line tools and easy access to system resources, making it a suitable choice for our file management automation script.
Writing the Code
Let’s go through the key sections of our Bash script:
Setting Destination Folders
We start by setting the destination folder paths for Git repositories and images. These paths will be used throughout the script for moving files. Here’s the code snippet:
# Set the destination folder paths
gitDestination="$HOME/Documents/Testing-Repo"
imageDestination="$HOME/Pictures/Images"
Functions for Moving Images and Git Repositories
Next, we create two functions to handle the movement of image directories and Git repositories. The moveImages() function moves image files from a specified folder to the image destination folder, while the moveGitRepo() function moves Git repositories to the Git destination folder. These functions perform necessary checks and move the files accordingly. Here are the code snippets:
# Function to move images to the image destination folder
moveImages() {
    # Code snippet for moving images
    # ...
}

# Function to move Git repositories to the Git destination folder
moveGitRepo() {
    # Code snippet for moving Git repositories
    # ...
}
Checking and Moving Existing Files
The script starts by checking if the destination folders for Git repositories and images exist. If they don’t, it creates them using mkdir -p. Then, it moves existing Git repositories (excluding those with images) and image files from the Downloads folder to the designated destination folders. Here’s the code snippet:
# Check if the destination folder exists for Git repositories, if not, create it
if [ ! -d "$gitDestination" ]; then
    mkdir -p "$gitDestination"
    echo "✅ Created destination folder for Git repositories: $gitDestination"
fi

# Move existing Git repositories to the destination folder, excluding those containing images
find "$HOME/Downloads" -maxdepth 1 -type d -name "*.git" -exec sh -c '
    repoDir=$(dirname "$0")
    if ! find "$repoDir" -type f -exec file -N -i -- {} + | grep -qE "image/"; then
        moveGitRepo "$repoDir" "$gitDestination"
    fi
' {} \;


# Check if the destination folder exists for images, if not, create it
if [ ! -d "$imageDestination" ]; then
    mkdir -p "$imageDestination"
    echo "✅ Created destination folder for images: $imageDestination"
fi

# Move all existing image files from the Downloads folder to the image destination folder
moveImages "$HOME/Downloads" "$imageDestination"
Live Monitoring for New Files
The script enters a live monitoring loop using inotifywait. It waits for new directory creations in the Downloads folder and performs actions based on the type of the newly created directory. If it’s a Git repository without images, it waits for 3 minutes using a countdown timer and then moves it to the Git destination folder. If it’s an image directory, it moves it to the image destination folder. Here’s the code snippet:
# Start live monitoring of the Downloads folder for new directory creations using inotifywait
inotifywait -m -e create -r --format "%w%f" -q "$HOME/Downloads" |
while read -r directory; do
    # Check if the newly created directory is a Git repository
    if [ -d "$directory/.git" ]; then
        # Check if the Git repository contains images
        if ! find "$directory" -type f -exec file -N -i -- {} + | grep -qE "image/"; then
            # Move the Git repository to the Git destination folder after 3 minutes
            moveGitRepo "$directory" "$gitDestination" &
        fi
    elif file -N -i "$directory" | grep -qE 'image/'; then
        # Check if the newly created directory is an image
        # Move the image directory to the image destination folder
        moveImages "$directory" "$imageDestination"
    fi
done
Running the Script as a System Process
To ensure our script runs as a background process whenever the Linux system starts, we’ll create a systemd service. This allows the script to run continuously in the background, monitoring files and performing actions. Follow the steps below to create and configure the systemd service:
- Create a service file for the script using a text editor, such as
nano:
sudo nano /etc/systemd/system/file-management.service
- Add the following content to the file:
[Unit]
Description=File Management Script
After=network.target

[Service]
ExecStart=/bin/bash /path/to/your/script.sh
Restart=always

[Install]
WantedBy=multi-user.target
Replace /path/to/your/script.sh with the actual path to your Bash script.
-
Save the file and exit the text editor.
-
Reload systemd to read the new service:
sudo systemctl daemon-reload
- Enable the service to start on boot:
sudo systemctl enable file-management.service
- Start the service:
sudo systemctl start file-management.service
- Verify that the service is running:
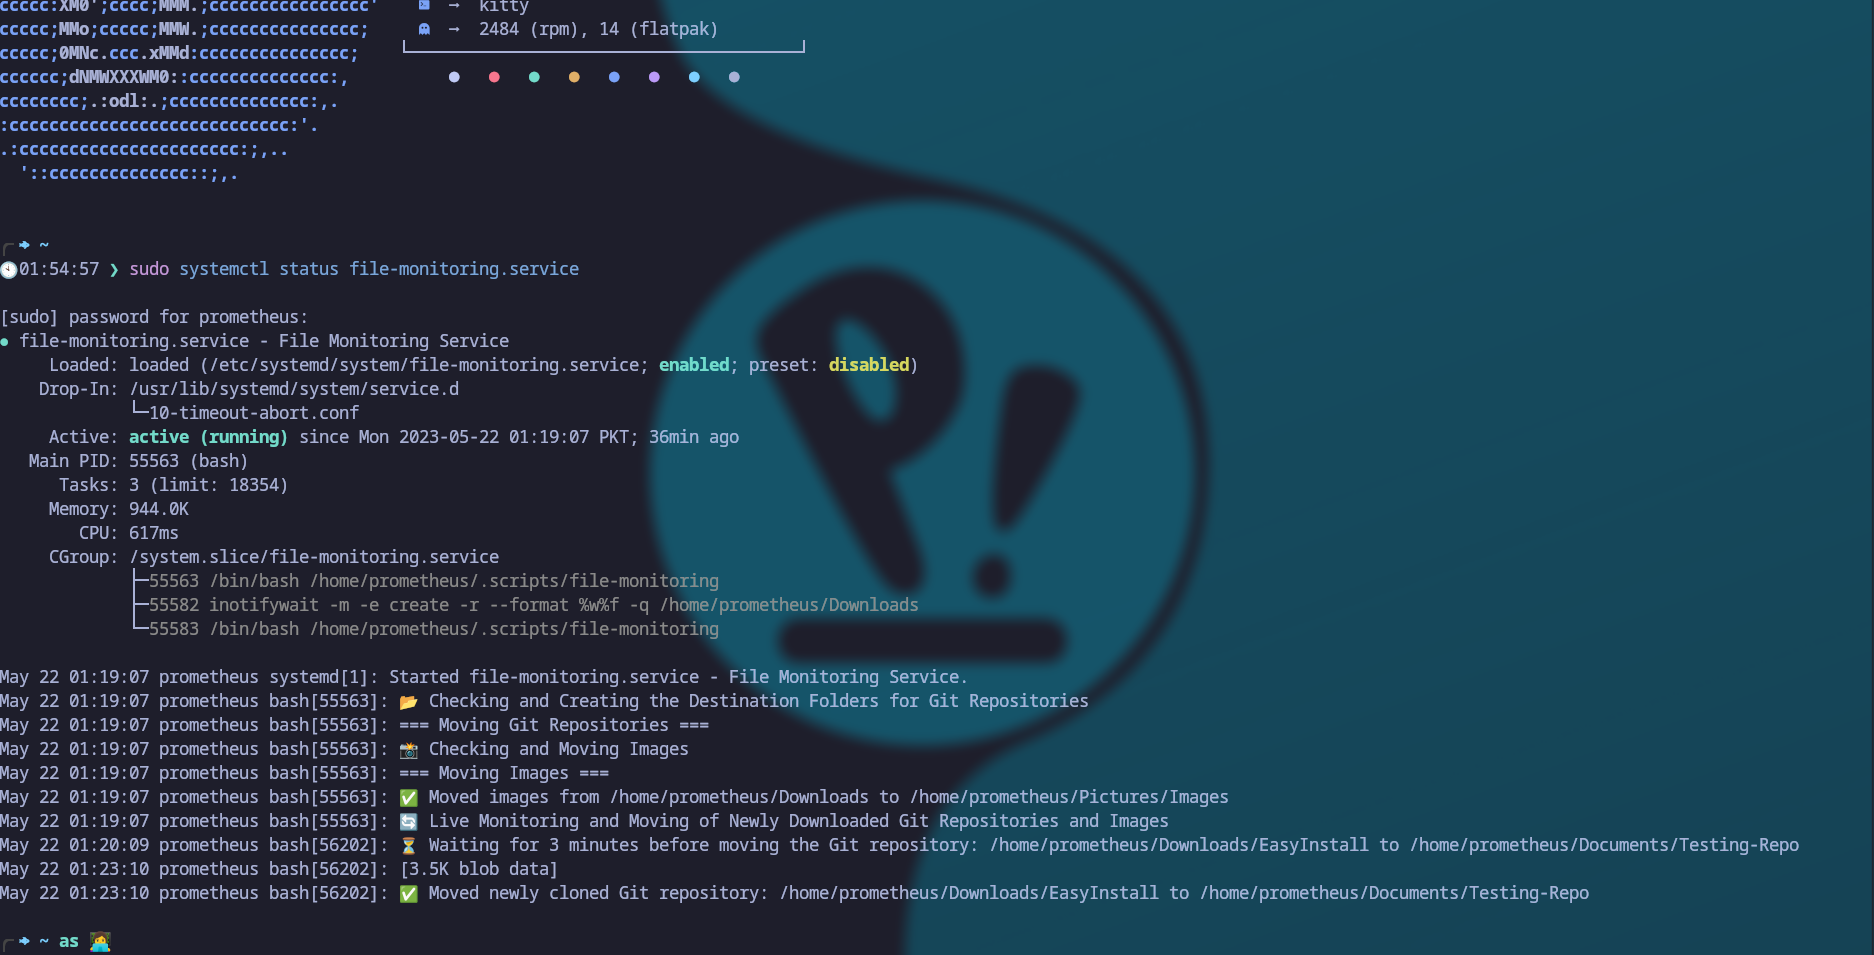
sudo systemctl status file-management.service
Congratulations! Your script is now running as a system process. It will start automatically on system boot and continue monitoring files in the background.
Screenshot: Created System Process for File Management Script
Conclusion
Automating file management can greatly enhance productivity and reduce manual errors. With our Bash script, we’ve demonstrated how to monitor Git repositories and images, and efficiently move them to designated folders. By following the step-by-step process, you can easily develop your own file management automation script. Running the script as a system process ensures it remains active whenever your Linux system is on, providing continuous file monitoring and management. Save time, streamline your workflow, and enjoy a more organized file system with this powerful automation solution.
Remember to test the script thoroughly and consider any specific edge cases or error scenarios before deploying it. With a little customization, this script can be adapted to fit your specific file management needs. Happy automating!
Please note that this blog post assumes familiarity with Bash scripting and basic Linux system administration.
With that, we will see you next time.❤️❤️
Credit:
This article was written by Abdul Rafay and published on Future Insight.
Contact Us:
If you encounter any issues or have any questions regarding any of the articles on this website, please do not hesitate to contact the website’s support team. Your feedback is important and the team is dedicated to providing prompt and effective assistance to ensure a positive user experience.
To access the contact page, simply click on the “Contact” tab in the navigation menu or visit the following URL: contact page. From there, you can fill out a contact form or find additional information on how to get in touch with the support team.
Don’t let any questions or concerns go unanswered - reach out to the support team for help and guidance. They are committed to providing excellent customer service and will do everything possible to ensure that you have a seamless experience on the website.
Supporting Materials
Here are all of the links and references that I used to write this blog, so feel free to visit them to get some more help.
GitHub Repository
Thumbnail: