If you’re a Linux user who owns an Nvidia graphics card, you may have experienced some difficulties getting your graphics card to work properly. Arch Linux is a popular Linux distribution known for its minimalism and customizability, and installing Nvidia drivers on Arch Linux can be a bit more challenging than on other distributions. However, with the right steps and knowledge, you can successfully install Nvidia drivers on Arch Linux and enjoy a better graphics experience on your system. In this blog post, we’ll guide you through the process of installing Nvidia drivers on Arch Linux, so let’s get started!
Prerequisite:
In order to install Nvidia drivers on your system, there are a couple of things that need to be checked.
-
Check which kernel you are running on your system. To check which kernel you are running, enter this command in your terminal.
uname -r -
Check which session you are running—is it Xorg or Wayland? Enter this command to checkout.
loginctl show-session $XDG_SESSION_ID -p TypeThis command will display the type of session you are currently running, which can be either “x11” or “wayland”. If the output is “Type=x11”, it means that you are running an Xorg session, and if the output is “Type=wayland”, it means that you are running a Wayland session.
-
Check which graphics card you are running on your system, and to check, enter the following command into your terminal:
lspci -k | grep-A 2 -E "(VGA | 3D)"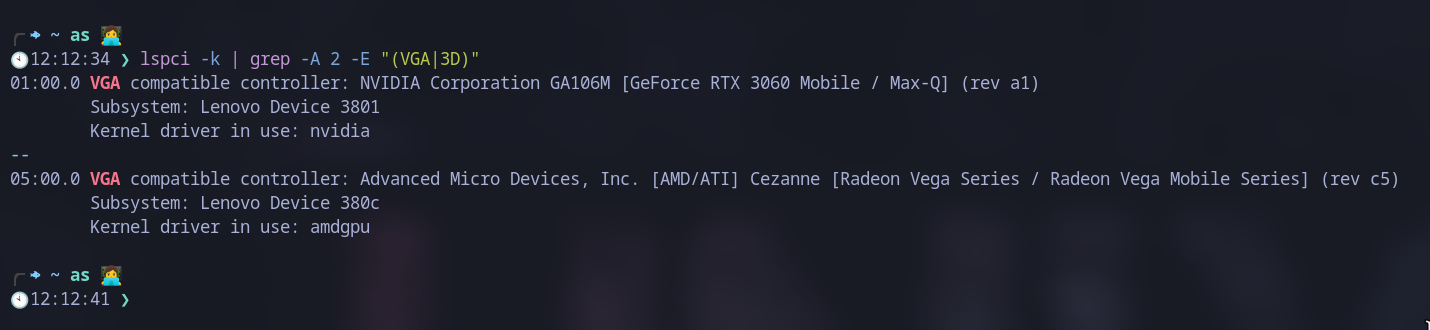
For me, I have two GPUs: an AMD integrated one and an Nvidia RTX 3060 Mobile.
-
Now that you know the model of your GPU, it’s time to go search for a driver using this link. Here you will find the model number of your GPU.
Implementation:
To install the nVidia driver, there are four things that must be kept in mind.
- Driver for supported cards
- Driver for Unsupported Cards
- Which kernel are you using?
- How can I switch between Intergated Graphics and Nivida Graphics?
Supported Cards:
- Before you begin, make sure that your system is up-to-date by running the following command in the terminal:
sudo pacman -Syu - If your kernel is new and your GPU is supported, then all the drivers can be installed using these commands.
The above package will install all the drivers on your system.
sudo pacman -Sy nvidia nvidia-settings nvidia-utils
Unsupported Cards:
- If you have an older card, NVIDIA no longer actively supports drivers for your card. This means that these drivers do not officially support the current Xorg version. Thus, it might be easier to use the nouveau driver, which supports the old cards with the current Xorg.
- To install the nouveau driver, enter the following command in your terminal.
paru -S xf86-video-nouveau
Remember, these are open-source drivers and might not be as good as the originals, but still, something is better than nothing. To read more about unsupported drivers, checkout the Arch Linux Wiki.
Custom Kernel:
- If you are running a custom kernel, for example, a “Zen Kernel” or an “Xmond Kernel,” these are different versions of the kernel that have been modified by the community to get more power.
- So if you are running such a kernel, then you need to install this driver.
paru -S nvidia-dkms - Paru is an AUR helper, and if you don’t have it installed, then install it using these commands.
    sudo pacman -S --needed base-devel
    git clone https://aur.archlinux.org/paru.git
    cd paru
    makepkg -si
Enabling Drivers:
If your session is on Xorg, then you need to activate it manually; if you are on Wayland, then it will work automatically. To enable it, follow these instructions.
- Once the driver is installed, you need to enable it. You can do this by creating a configuration file using the following command:
sudo nano /etc/X11/xorg.conf.d/20-nvidia.conf - In the configuration file, add the following lines:
    Section "Device"
    Identifier "Nvidia Card"
    Driver "nvidia"
    EndSection
Save the file and exit the editor.
Switch between Nvidia Graphics and Intergated Graphics
There are a couple of ways to switch to graphics.
- Using EnvyControl
- Using Optimus Manager
- Using Prime All three methods are good and serve different purposes.
EnvyControl
EnvyControl is a CLI tool that provides an easy way to switch between GPU modes on Nvidia Optimus systems (i.e., laptops with hybrid Intel and Nvidia or AMD and Nvidia graphics configurations) under Linux.
To install it, just enter the following command:
paru-S envycontrol
Switch Mode:
Run “sudo envycontrol -s MODE>” to switch graphics mode. There are three modes.
- Interfrated
- hybrid
- Nvidia
Commands to change mode:
- Set graphics mode to integrated
sudo envycontrol's integrated - Set graphics mode to hybrid.
sudo envycontrol --s hybrid - Set graphics mode to Nvidia:
sudo envycontrol -s nvidia
For more information, check out the EnvyControl page on GitHub.
Optimus Manager
This Linux program provides a solution for GPU switching on Optimus laptops (i.e., laptops with a dual Nvidia/Intel or Nvidia/AMD configuration).
To install it, just enter the following command:
paru-S optimus-prime
Switch Mode:
optimus-manager --switch nvidiato switch to the Nvidia GPUoptimus-manager --switch integratedto switch to the integrated GPU and power the Nvidia GPU offoptimus-manager --switch hybridto switch to the iGPU but leave the Nvidia GPU available for on-demand offloading.
To read more about Optimus Prime, check out these links:
Prime
PRIME is a technology used to manage hybrid graphics found on recent desktops and laptops (Optimus for NVIDIA, AMD Dynamic Switchable Graphics for Radeon). PRIME GPU offloading and Reverse PRIME are attempts to support muxless hybrid graphics in the Linux kernel. PRIME GPU offloading We want to render applications on the more powerful card and send the result to the card that has a display connected.
The command xrandr --setprovideroffloadsink can be used to make a render offload provider send its output to the sink provider (the provider that has a display connected). The provider and sink identifiers can be numeric (0x7d, 0x56) or a case-sensitive name (Intel, Radeon).
Prime is a CLI-based way that you can run certain tasks on your Nvidia GPU without switching the whole system to Nvidia Graphics. This can be helpful when all of the power of the GPU is needed for a certain application.
To install Prime, enter the following commands:
paru -S nvidia-prime
Run Commands
To render any application on your GPU, enter the following command in your terminal:
prime-run <Application-Name>
Example:
prime-run android-studio
Reboot:
Finally, restart your computer to apply the changes:
sudo reboot
That’s it! You should now have NVIDIA drivers installed and running on your Arch Linux system.
Conclusion:
In conclusion, installing NVIDIA drivers on Arch Linux can be a bit challenging, but it’s definitely doable if you follow the right steps. We’ve covered the main methods for installing the drivers, including using the official NVIDIA installer, the Arch User Repository, and the DKMS method. Each method has its own advantages and disadvantages, so you should choose the one that works best for your particular setup.
Remember that installing the NVIDIA drivers is just the first step in getting your graphics card to work properly. You may also need to configure your Xorg settings, tweak your power management settings, or install additional software packages depending on your needs. But by following the steps outlined in this guide, you should be well on your way to getting your NVIDIA GPU up and running on Arch Linux. Good luck!
With that, we will see you next time.❤️❤️
Credit:
This article was written by Abdul Rafay and published on Future Insight.
Contact Us:
If you encounter any issues or have any questions regarding any of the articles on this website, please do not hesitate to contact the website’s support team. Your feedback is important and the team is dedicated to providing prompt and effective assistance to ensure a positive user experience.
To access the contact page, simply click on the “Contact” tab in the navigation menu or visit the following URL: contact page. From there, you can fill out a contact form or find additional information on how to get in touch with the support team.
Don’t let any questions or concerns go unanswered - reach out to the support team for help and guidance. They are committed to providing excellent customer service and will do everything possible to ensure that you have a seamless experience on the website.
Thumbnail: