As a developer, managing your code can be difficult, and you’re always changing it, adding new features, and removing bugs from your application, so you need a way to track your code and make sure you don’t miss any of the changes. So for that, you need to learn Git and GitHub.
Before Git:
But before I was using Git, My code folder structure was something like this:
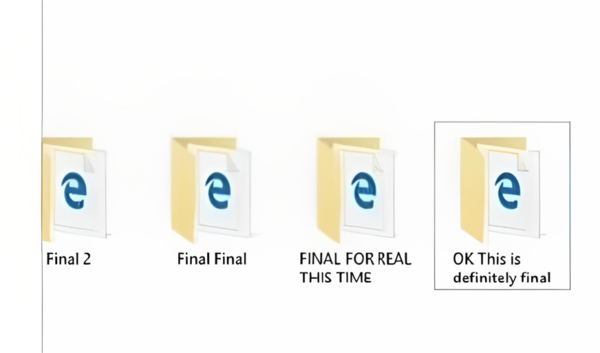
Every time I was working on a project, I made a copy of that folder and then made changes to it, which led to the destruction of your application.
Importance of Git
There are multiple reasons why you should use git and GitHub.
- Using Git and GitHub, you can save different versions of code without losing any data.
- When you publish your code, others can view it, read it, and even contribute to your project.
- There is the option of adding documentation to your code, so that if you forget how it works, you can refer to or read the documentation to run it.
Personal Experience:
I can’t tell you how many times I’ve lost data and code because I didn’t use git and GitHub. I have worked on hundreds of projects, and one time I was not updating or saving my code on Github, and my computer crashed. All of my work and my code were gone. From that point on, I learned git and used GitHub to keep my code saved.
What is Git?
Git is a version control system that allows you to contribute to existing projects or start new ones.
Git is a mature, actively maintained open source project originally developed in 2005 by Linus Torvalds, the famous creator of the Linux operating system kernel. A staggering number of software projects rely on Git for version control, including commercial projects as well as open source. Developers who have worked with Git are well represented in the pool of available software development talent, and it works well on a wide range of operating systems and IDEs (integrated development environments).
What is GitHub:
GitHub is a code hosting platform for collaboration and version control.
GitHub lets you (and others) work together on projects.
Important Terms:
So before you learn how to use git, you need to learn a couple of important terms, which are stated below:
- Repositories
- Branch
- Commits
- Pull Requests
- Push Request
Repositories
-
A GitHub repository can be used to store a development project.
-
It can contain folders and any type of files (HTML, CSS, JavaScript, Documents, Data, Images).
-
To simple words it’s a folder in which your store all of your code with a couple of essential files such a licence and a ReadMe File
-
A GitHub repository should also include a licence file and a README file about the project.
-
The “README” file tells you about your project, how you will run the applications, and an introduction to your project.
-
The licence file will tell the user which kind of Project is this, IS it MIT Project or General Public licence.
Branch
-
A GitHub branch is used to work with different versions of a repository at the same time.
-
By default a repository has a master branch (a production branch).
-
Any other branch is a copy of the master branch (as it was at a point in time).
-
New Branches are for bug fixes and feature work separate from the master branch. When changes are ready, they can be merged into the master branch. If you make changes to the master branch while working on a new branch, these updates can be pulled in.
Commits
-
At GitHub, changes are called commits.
-
Each commit (change) has a description explaining why a change was made.
Pull Requests
-
Pull Requests are the heart of GitHub collaboration.
-
With a pull request you are proposing that your changes should be merged (pulled in) with the master.
-
Pull requests show content differences, changes, additions, and subtractions in colors (green and red).
-
As soon as you have a commit, you can open a pull request and start a discussion, even before the code is finished.
Push Request:
- Push requests occur when you want to update your local code folder to the branch’s deployed branch code; if there are any changes, then all the changes will be made on your local machine.
Install Git:
To install git enter the following commands in the terminal:
Linux:
Debian or Ububtu:
sudo apt install git -y
Arch Linux:
sudo pacman -Syyu git --noconfirm --needed
Windows
Install git using winget:
winget install git
Download an exe You can download an exe file by click her
Mac Os
brew install git
Note: if Home Brew is not installed on your system then install it by using the follwong command:
/bin/bash -c "$(curl -fsSL https://raw.githubusercontent.com/Homebrew/install/HEAD/install.sh)"
Git Commands:
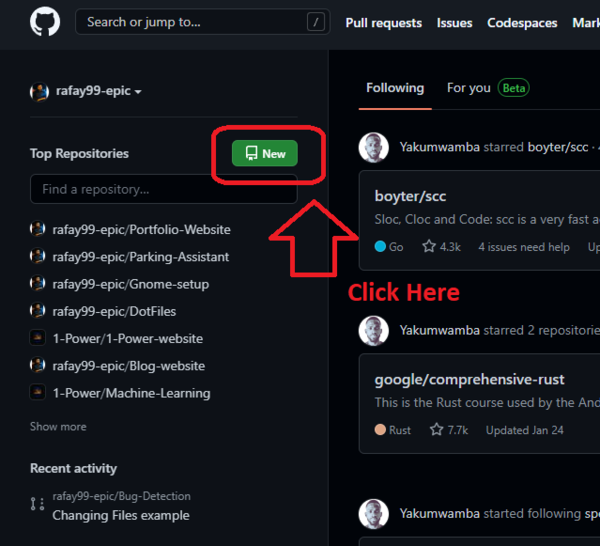
Create a Repo:
-
Open GitHub and create an account. If you don’t have an account then follow this Guide.
-
Then Press the new Button to create a new Repo:
-
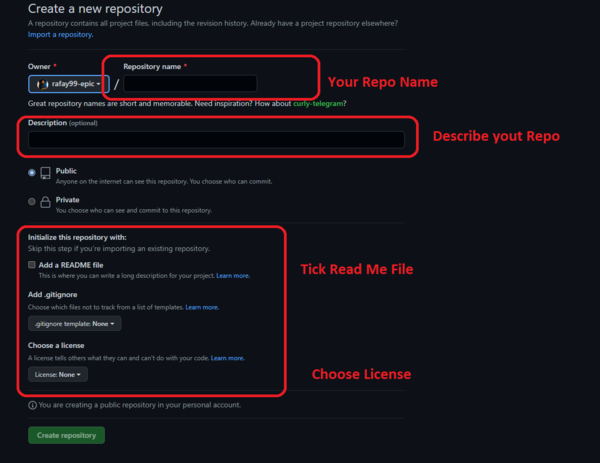
Fill the form to create your Repo.
- Enter The name of the repo
- Enter the description of the repo
- Select the Lience for the repo
-
Once You have filled the form then click on the create Repo button.
-
After click that button your repo will be created and you will be redirected toword your repo.
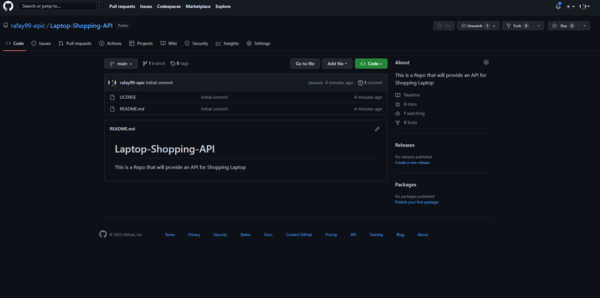
Congratulation You have created your own repo.
Cloning the repo:
Now you want to add files to the REOP. But first, we need to clone the repo on your machine, which requires you to run a command in your terminal.
git clone <repo URL>
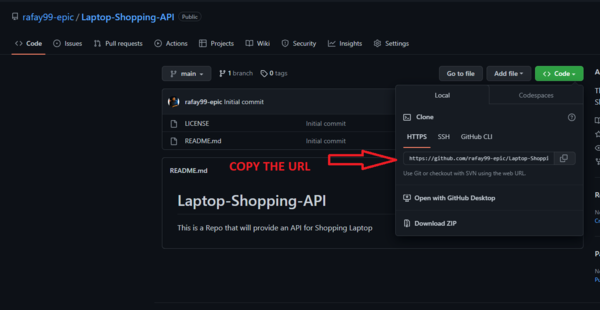
The above is the command. But for now, I’ll be cloning the Laptop-Shopping-API repo. So command will be
git clone https://github.com/rafay99-epic/Laptop-Shopping-API.git
Note: You can find the URL of the repo by clicking the code Button on your repo.
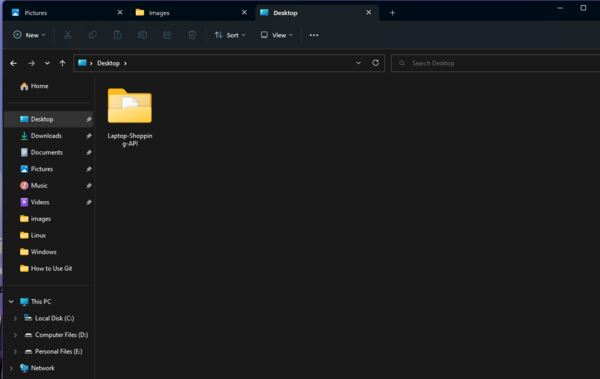
Once command is in the terminal then press enter on your keyboard to clone the repo on your device.
When you clone the repo it will look like this:
Create a Branch:
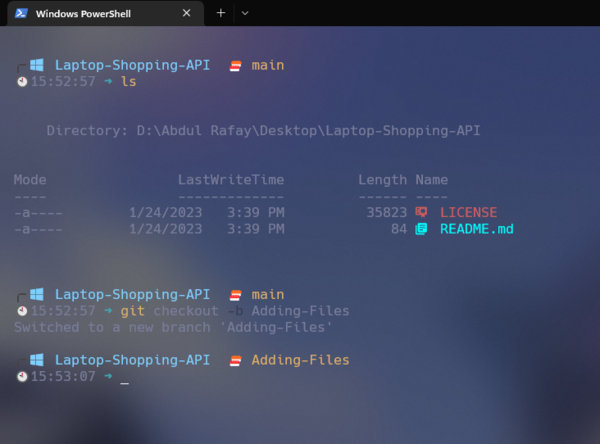
Now we want to upload files to this repo so we need to create a branch so do that we need open this folder using the terminal.
cd <Folder name>
For this example:
cd Laptop-Shopping-API
Once you are in the folder then to create a branch.
Note: Always remeber that when you clone a repo on your machine by default you will be on the Main Branch.
git checkout -b <branch Name>
Example:
git checkout -b Adding-Files
Once the above commad is entered into the termial then a brach will be created.
Using the above command you can create different branch.
Switch Branch:
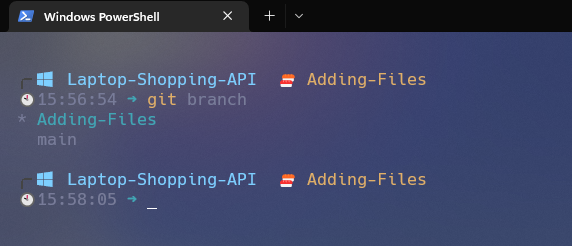
What if branches already exist and you want to checkout a different branch? There is a command for that as well.
git branch
Using the above command, you will see all of the git branches.
Now to switch between different branch, to that enter the following command:
git checkout <branch name>
In place of “branch name,” enter the branch name. In this example, I will be entering this command.
git checkout main
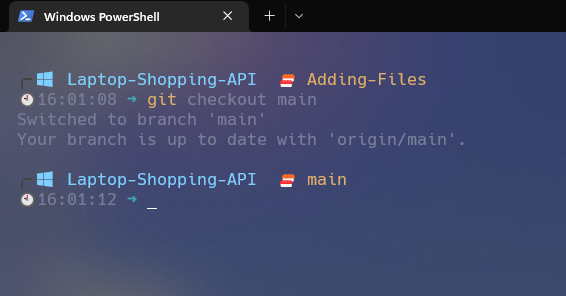
As you can see, I have switched to the main branch, but I will be switching to the adding-file branch.
Now add some files to the branch and make all the changes. I will be adding some Python files along with the PowerShell file.
Check Status:
To check the status and see how many changes are made to that, enter the following command:
git status
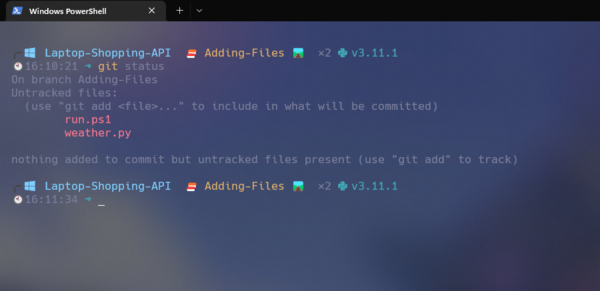
As you can see, I have added two files, and using the command git status , I can view all of the changes that have been made.
Adding Files:
Now add these files to the branch; to do that, you need to enter the following command in the terminal:
git add *
The above command will add all the files to the branch.
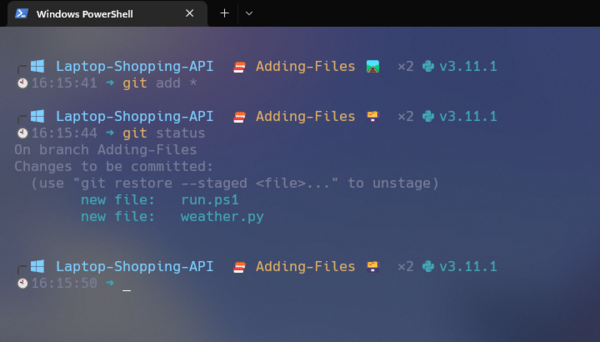
Now that all the files are added to the branch, when files are added, the colour will change from red to green. The green colour can change depending on the colours of your terminal.
Commiting:
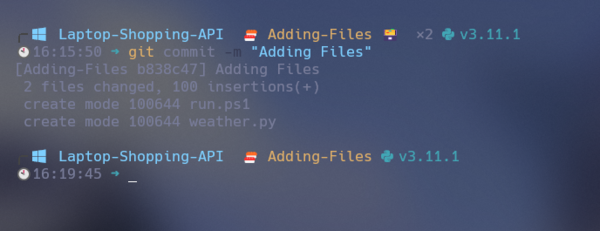
Now it’s time to commit your code and add a message. To do that, please enter the following commands into the terminal:
git commit -m "adding Files"
The above command will commit your code with a message; the message is important, and it won’t commit without a message, so enter your message.
Push:
Now it’s time to deploy your local branch and push your code to the repo.
Deploy your branch:
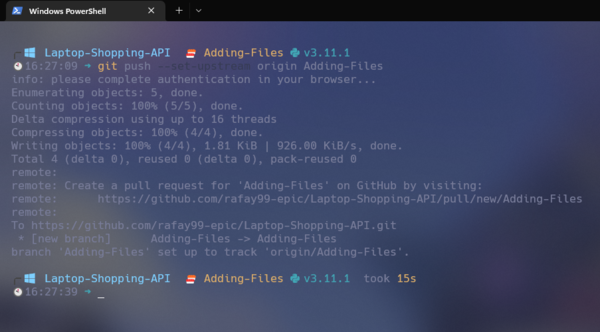
To deploy your branch on GitHub then enter the following commands:
git push --set-upstream origin <branch name>
In place of “branch name,” enter the branch name on which you are working.
For this example, the branch name is Adding-Files
git push --set-upstream origin Adding-Files
The above command will deploy your branch to GitHub.
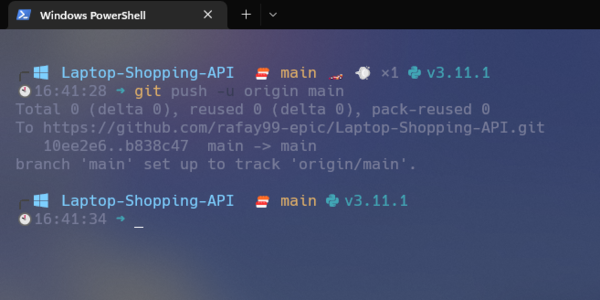
Push Command:
To push your code enter your code into the teminal:
git push
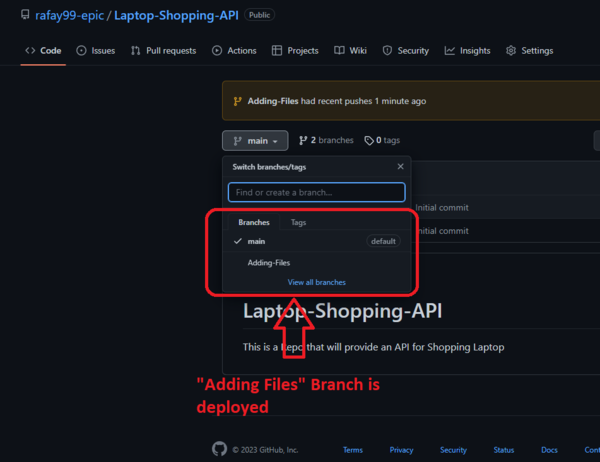
Final Result:
As you can see, the branch is deployed, and all the files are in the Adding-file branch.
Merge Both Branch:
Now all the files are in the Adding-File branch, but we need them to be added to the main branch. For that, we will be merging both branches.
This is the stage at which you develop and test your code and application without changing or deploying it to the main repository.
To merge these branches, we need to create a pull request and merge them. To do that, there are some commands.
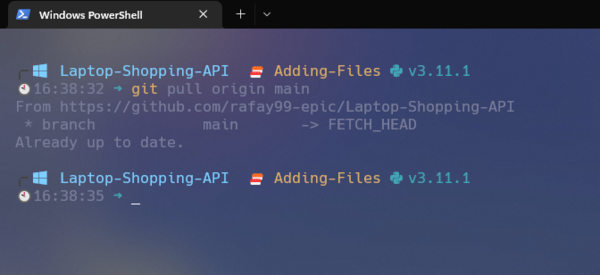
Step 1: Clone the repository or update your local repository with the latest changes.
git pull origin main
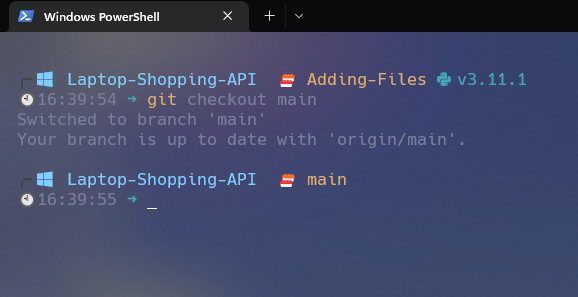
Step 2: Switch to the base branch of the pull request.
git checkout main
 Step 3: Merge the head branch into the base branch.
git merge Adding-Files
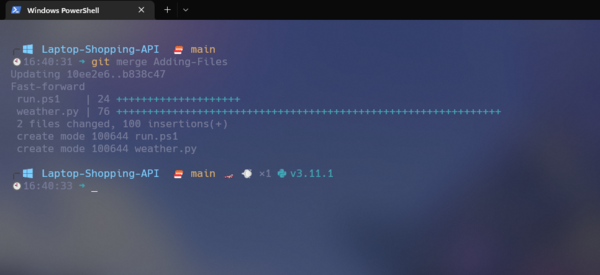 Step 4: Push the changes.
git push -u origin main
Final:
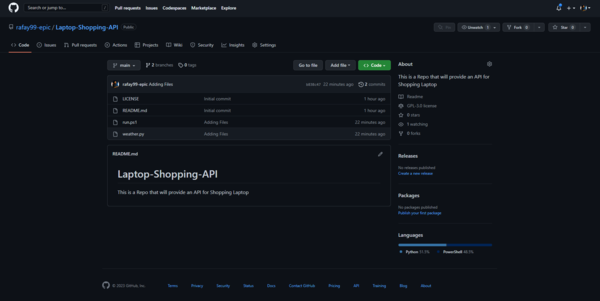
Now that you can view GitHub, all the files are added to the main branch. You can make changes to one branch, and once you are sure that the application is working well, you can merge the working branch with the main branch.
Version of Applications:
This is how versions are made: each branch represents a single version. When that branch is developed and tested, it will be merged into the main branch, and then your code is deployed.
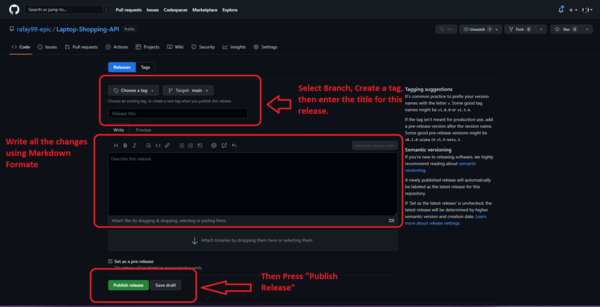
Release Pages:
This is the release page; you can document each version here, and each version will be assigned a number.
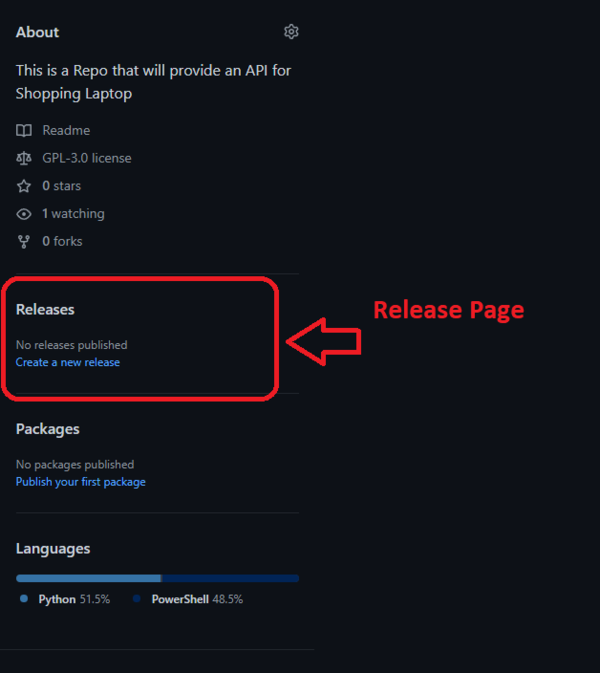
Fill out all of the changes and then press the “Publish” button to publish your work on GitHub.
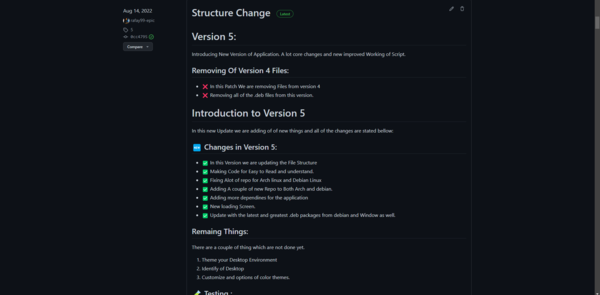
Example Release Pages:
This is an example of developing a project.
Conclusion:
Learn Git, use GitHub to host your code, applications, and much more, Git and GitHub are two of the most important tools for developers, and without them, we might not be able to learn, read, or contribute code. You must learn Git and GitHub regardless of your field.
So please do not hesitate to contact or email me. I would love to know your thoughts.
With that, we will see you next time.❤️❤️
Credit:
This article was written by Abdul Rafay and published on Future Insight.
Contact Us:
If you encounter any issues or have any questions regarding any of the articles on this website, please do not hesitate to contact the website’s support team. Your feedback is important and the team is dedicated to providing prompt and effective assistance to ensure a positive user experience.
To access the contact page, simply click on the “Contact” tab in the navigation menu or visit the following URL: contact page. From there, you can fill out a contact form or find additional information on how to get in touch with the support team.
Don’t let any questions or concerns go unanswered - reach out to the support team for help and guidance. They are committed to providing excellent customer service and will do everything possible to ensure that you have a seamless experience on the website.